Real‑world stain removal, scratch repair, and full color restoration-told by the owner
Backstory: why I restored instead of replacing
The sofa came from my parents. Sentimental value aside, good leather is a long‑game material. Treated properly-stable temperature and humidity, protection from light, and zero “miracle dressings”-it can last for decades. That’s the spirit of museum care as well: avoid aggressive interventions, keep conditions steady (roughly 45–65% RH is the safe corridor, while sustained humidity above ~75% invites mold), and be skeptical of oils and “saddle soap” fixes.
Austin complicates things: long, hot summers and hard sun in a humid subtropical climate. UV and heat punish leather finishes, and humidity swings accelerate aging. Before any work started, I moved the sofa away from windows and vents and asked the technicians to leave me a microclimate plan when they were done.
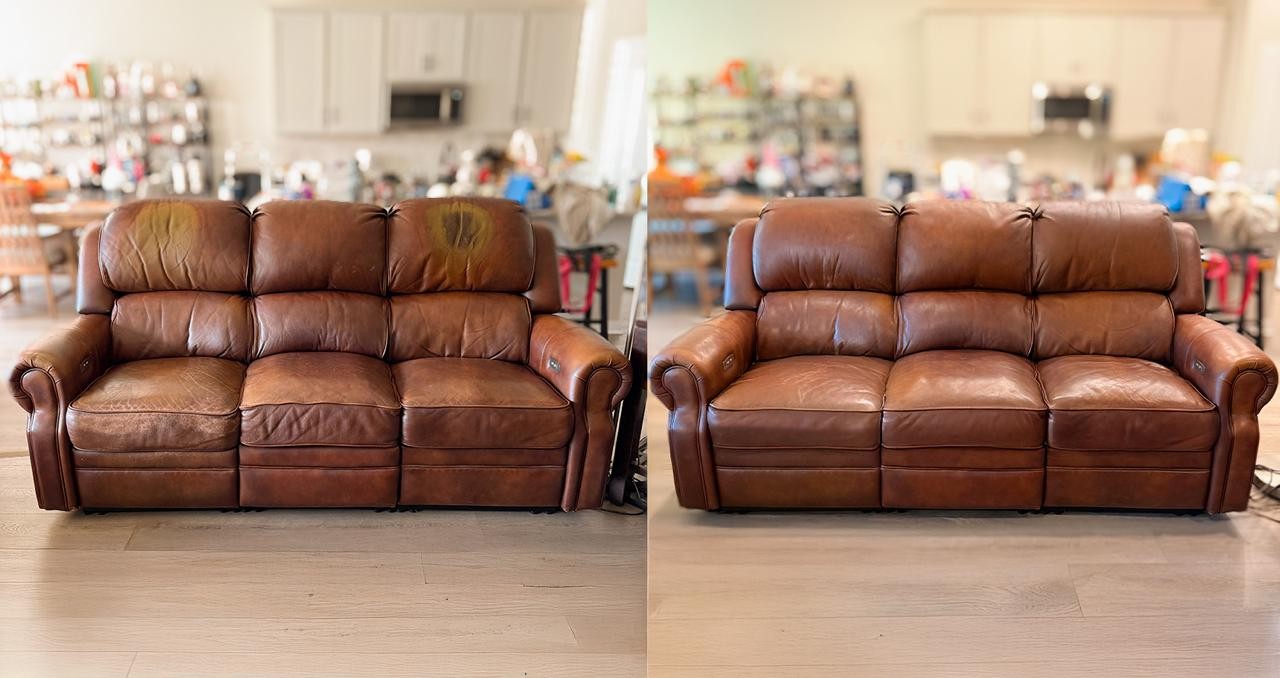
The “before” picture
- Body‑oil stains at the top of the backrest (plus a pen mark on an arm).
- Scratches and rub‑throughs across the seats, with cat signatures along the sides.
- Faded, uneven color and an overall tired look.
The crucial question was leather type. Furniture typically uses:
- Pigmented (protected/finished): color plus a protective clear coat. Defects can be masked with pigment and top‑coat-ideal for thoughtful recoloring.
- Aniline: velvety, natural character but highly sensitive to stains and fading; it demands gentler, conservation‑first work.
- Bonded/faux (PU composites): if a film is lifting or peeling, that’s delamination of a coating, not leather aging; durable repairs aren’t realistic beyond camouflage or full re‑cover.
Mine turned out to be pigmented brown leather-a great candidate for full color restoration.
Who I spoke with-and who I chose
I requested estimates from three Austin shops: Leather Repair Gallery, Leather Repair Austin, and Fibre New. I went with Leather Repair Gallery because their approach lined up with what I wanted:
- Minimum intervention, maximum preservation: clean and stabilize first, then local repairs, and only after that-color and finish.
- Clear differentiation between protected and aniline leathers (no false promises on sensitive hides).
- Documentation: before/after photos, a damage map, and a materials list.
- Proper tools for repigmentation: HVLP/airbrush, elastic fillers, and multiple top‑coats with different sheens.
That sequence-conservation first, cosmetics second-is the same logic I kept seeing in professional leather care.
The plan-and how the work actually went
1) Stain removal (including ink)
- Gentle, purpose‑made cleaner to lift surface soils and body oils first.
- A dedicated ink remover-but only because this is protected leather. Products like this are explicitly “for protected leather only” and are not for aniline or nubuck.
- Why not home hacks? Kitchen acids, saddle soap, or oils migrate into fibers, darken unpredictably, get tacky, and create irreversible changes. The short‑term “wow” can turn into long‑term regret.
2) Scratch and wear repair
- Trimming feathered fibers, then a binder to strengthen the grain around damaged spots.
- Elastic filler applied in several thin coats, each lightly abraded with very fine grit.
- The goal is flexibility: the repair needs to bend with the leather without cracking.
3) Full color restoration (repigmentation)
- Surface prep: controlled degreasing and a light mechanical dulling to key the surface.
- Color match pulled from a hidden reference (the back of a cushion), then pigment applied in fine passes via airbrush/HVLP for even coverage without clogging the grain.
- Protective top‑coat (matte/satin/gloss) with proper cure. We chose satin to match the room-lively but not plastic.
This method works with the nature of protected leather, which is designed to accept pigment and a clear finish as part of normal refurbishment.
The result
- The ink and body‑oil halos disappeared.
- Scratches and cat trails no longer catch the eye-or the hand.
- The finish settled into a satin glow that feels like leather, not plastic.
I left with a care card: soft‑brush vacuuming, wipe‑downs with the correct cleaner, and a light maintenance cycle every ~6 months for an active household (cleaning plus protection suitable for protected leather).
What it cost (and what to expect)
U.S. market ballparks will vary by sofa size, leather type, and scope, but these ranges matched what I saw locally:
- Targeted cosmetics (stains, small scuffs, minor wear): ~$190
- Expanded repairs (scratch work, crack fill, sheen leveling): ~$280
- Full‑sofa repigmentation: $940+, depending on area and condition
- Reupholstery is another category entirely.
My package-stain removal + scratch repair + full color-landed well below the cost of a quality new leather sofa and definitely less than reupholstery.
Important reality check: If your “leather” is actually bonded/PU and the film is peeling, there’s no durable restoration. Honest advice: consider re‑covering or replacement.
What I learned as an Austin owner
- Light and heat are leather’s enemies. Shift seating out of direct sun, add curtains or window film, and don’t park the sofa against radiators or supply vents. No space heaters for drying.
- Stabilize the microclimate. Aim for 45–65% RH, avoid big swings, and remember that >~75% RH invites mold.
- Biannual prevention pays off. Every ~6 months: gentle cleaning plus an appropriate protector for protected leather.
- Skip saddle soap and oils. They migrate and prematurely age leather.
- Treat ink by leather type. On protected leather, specialty removers can work; on aniline, head straight to a professional.
Why this workshop was the right fit
- They identified the leather type first and explained where cosmetics are ethical-and where they’re not.
- The workflow ran from conservation to aesthetics: stabilize, then beautify.
- They matched sheen (satin) to my room rather than forcing a generic gloss.
- I received a transparent report with photos and Austin‑specific aftercare on UV and humidity.
Trust, for me, came from their alignment with best practices-not quick fixes.
Who might benefit from this approach
- Families with heirloom furniture who want to preserve history without that “plastic new‑build” look.
- Homes with kids and pets-properly restored and protected pigmented leather holds up to real life.
- Landlords and stagers who need fast visual impact without full reupholstery.
Want a fast, accurate quote? Send this
- 6–10 daylight photos: straight‑on front, both sides, arm tops, and close‑ups of scratches and stains.
- A short description: leather type (if known), age, and any previous cleaning attempts (with what).
- Sheen preference: matte, satin, or gloss-and your timeline.
- Your Austin address (to price on‑site vs. shop work).
Quick FAQ
Is a full recolor always appropriate?
For pigmented/protected leather, yes-when prep, pigment, and top‑coat are done correctly. For aniline, the default is gentler treatment or a partial conversion to a protected system (which changes the hand; discuss first).
Can I remove ink myself?
Sometimes, on protected leather, with professional ink removers used exactly as directed. On aniline, DIY attempts often make things worse-call a pro.
How long will the new color last?
It depends on use and environment. With sensible microclimate control and maintenance about every six months, the lifespan is far better than any “quick cosmetic” spray‑over.
If you’re sitting on an old Austin sofa the way I was, take heart. With the right diagnosis, a conservation‑minded process, and a satin finish that suits the room, an heirloom doesn’t just survive-it returns to the center of the home.
Write and Win: Participate in Creative writing Contest & International Essay Contest and win fabulous prizes.